
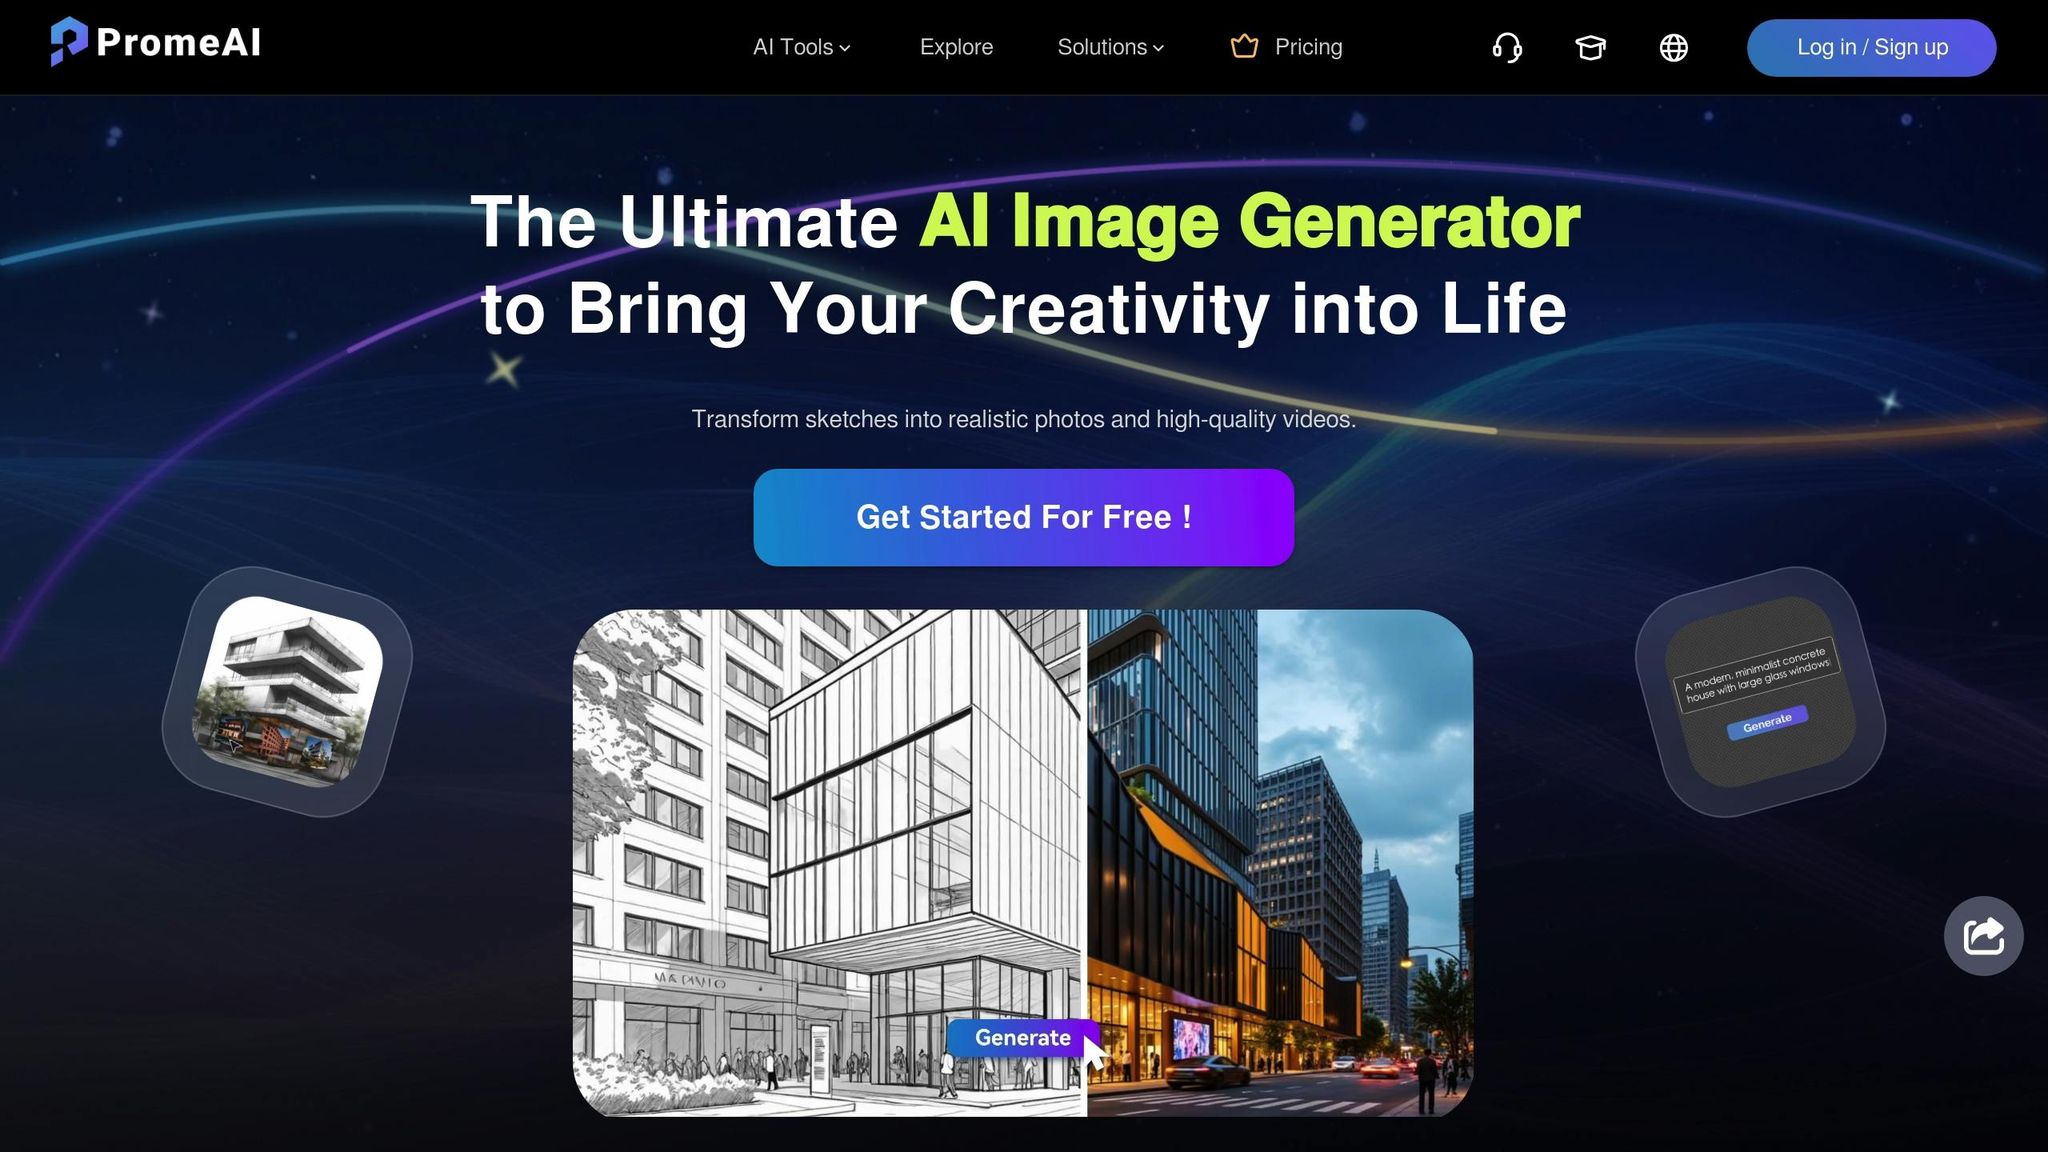
How to Convert Sketches to Photorealistic Renders
Turning sketches into photorealistic renders is now faster and more accessible with AI tools. Instead of spending hours on complex 3D modeling, you can upload a sketch and watch it transform into a lifelike image in minutes. This process helps architects and designers communicate their vision clearly, win client approval, and reduce costly revisions during construction.
Here’s what you’ll learn:
- Why photorealistic renders matter: They make designs easier to visualize, speed up decision-making, and improve presentations.
- How AI simplifies rendering: Modern platforms like Render a House automate material selection, lighting, and textures.
- Steps to prepare your sketches: Clean, black-and-white sketches with clear annotations produce the best results.
- Choosing the right AI tool: Compare platforms like Render a House, Rendair, and others to find the best fit for your needs.
- Tips for realistic results: Use accurate materials, lighting, and regional details to create convincing renders.
AI-powered rendering tools save time, reduce costs, and make professional-quality visuals available to everyone, from solo designers to large firms. By following this guide, you’ll streamline your workflow and create stunning visuals tailored to U.S. architectural styles.
AI Architectural Rendering In PromeAI: Sketch To Render!
What Is Photorealistic Rendering in Architecture
Photorealistic rendering creates images so realistic that they could be mistaken for photographs, even though they depict buildings that haven’t been constructed yet. Unlike traditional architectural drawings or basic 3D models, these renderings aim to replicate reality with incredible precision. By using advanced techniques like ray tracing and global illumination, they simulate how light, shadows, and textures interact with a structure, producing visuals that closely resemble the final built environment. This level of detail has made photorealistic rendering an essential tool in modern architectural projects.
What sets photorealistic rendering apart from other visualization methods is its focus on technical accuracy. While artistic renderings might use stylized elements to create a mood, photorealistic renders are all about precision. They showcase exact material details and demonstrate how light behaves across surfaces under different conditions.
In today’s architectural practice, photorealistic rendering plays a crucial role. It provides a clear and realistic presentation of design details, boosting confidence in the project’s feasibility and appeal. For real estate developments, these visuals are particularly impactful, offering a glimpse of the finished project before construction even begins.
Key Parts of a Photorealistic Render
Lighting is the backbone of a convincing render. It’s not just about illuminating a space; it’s about capturing the nuances of natural and artificial light, along with the shadows they create. Advanced rendering tools use global illumination to simulate how light bounces between surfaces, resulting in subtle color shifts and soft, natural shadows.
Material accuracy is what makes a render believable. Every surface must have the right combination of color, texture, reflectivity, and depth. For instance, wood should display its natural grain, metal should reflect light correctly, and fabric should absorb light realistically. Beyond materials, adding contextual elements - like furniture or decor - grounds the render in reality.
Environmental details give renders life by adding context and scale. Including elements like people, cars, or even animals helps viewers imagine how the space will feel when it’s in use. These additions make the scene feel inhabited and relatable rather than cold or empty.
Camera effects and depth of field complete the illusion of realism. Just like a real camera, professional renders incorporate details like lens blur, slight distortions, and exposure variations. These imperfections enhance the natural look of the image, making it feel more like a photograph.
US Design Preferences and Regional Factors
While photorealistic rendering emphasizes technical accuracy, it also reflects local design preferences. In the US, regional styles and building practices play a key role in how renders are tailored. Clients often expect familiar materials - like natural stone, cedar or vinyl siding, and region-specific roofing. For example, a render of a New England Colonial home might feature clapboard siding and slate roofing, while a Southwest-inspired design would showcase stucco textures and terra-cotta tiles.
Lighting preferences also vary by region. In Southern California, renders often address the challenges of strong, year-round sunlight, while Pacific Northwest projects highlight how spaces adapt to overcast skies. East Coast designs might emphasize seasonal changes, showcasing bright summer light alongside the shorter, dimmer days of winter.
American standards for scale and proportion also influence renders. Spacious layouts, higher ceilings, and larger windows are often expected, as these align with local preferences. Designs that might feel appropriate in Europe could seem too cramped for American homeowners, who tend to favor open, expansive spaces.
Outdoor living is another important aspect in US residential rendering. Many Americans value smooth transitions between indoor and outdoor areas, with features like patios, decks, and landscaped spaces. Elements like sliding glass doors or outdoor kitchens are often included to reflect the climate and lifestyle of the area.
Lastly, neighborhood context plays a vital role. Renders should show how a new building fits into the existing streetscape, respects local setback rules, and complements the character of the surrounding area. This is especially important for projects in historic neighborhoods or established suburban communities, where harmony with existing architecture is key.
Preparing Sketches for AI-Powered Rendering
When it comes to AI-powered rendering, the quality of your sketches plays a critical role. A well-prepared sketch sets the stage for accurate and realistic results. Unlike traditional rendering software, AI tools come with their own unique requirements. Taking the time to understand these requirements can save you from unnecessary headaches later on.
The process involves two key steps: converting your sketches into a compatible digital format and adding annotations that help the AI interpret your design. While this might sound simple, even minor missteps in formatting or annotation can lead to less-than-ideal outcomes.
Converting and Formatting Your Sketches
To get started, make sure your sketches are in a supported image format like JPG, PNG, TIFF, or WebP. If you're working with CAD files (such as DWG, DXF, or PDF), you can convert them to JPG by taking a screenshot. This step is essential because AI tools are designed to analyze visual data, not technical drawings.
Here are some tips to ensure your sketches are AI-ready:
- Stick to black-and-white sketches. High-contrast designs help the AI distinguish between elements more effectively. Using color can confuse the system, leading to unexpected material or color choices.
- Upload one perspective per image. Including multiple viewpoints in a single file can result in distorted or hybrid renderings. Perspective views are particularly helpful as they provide depth, which AI algorithms use to create realistic 3D renders.
- Remove dimensions and construction lines. These technical elements can be misinterpreted as part of the design, causing odd features to appear in your final render.
- Clean up your sketches. Erase any wrinkles, stray marks, or scribbles. AI tools process every line they see, so even minor imperfections can show up as unintended architectural details.
- Add shading. Shading helps the AI differentiate between materials and spaces, such as walls versus windows or doors.
- Avoid embedding text. Written annotations can confuse AI tools, interfering with their ability to interpret your design. Instead, use the platform’s prompt field to provide additional details.
Adding Clear Notes to Sketches
Annotations and prompts are your chance to guide the AI in creating a render that matches your vision. The more specific you are, the better the results.
- Start with the architectural style. Use clear descriptors like "Modern farmhouse", "Craftsman bungalow", or "Contemporary colonial". Platforms like Vizcom often prioritize the first words in a prompt, so leading with style information helps set the tone for the render.
- Be precise about materials. Instead of vague terms like "nice roof", specify details such as "charcoal gray asphalt shingles" or "bronze-finish standing seam metal roofing". Similarly, describe wall materials with terms like "limestone veneer" or "white stucco."
- Fill in missing elements. If your sketch lacks certain details, include them in your prompt. For example, you might write, "black shutters on all windows", "covered front porch with columns", or "attached two-car garage".
- Use imperial measurements. For US audiences, stick to feet and inches when specifying dimensions. Phrases like "10-foot ceilings" or "36-inch kitchen island" help the AI scale elements appropriately.
- Separate ideas with commas. This makes your prompt easier for the AI to process. For example, "Two-story colonial house, white clapboard siding, black shutters, slate roof, brick chimney, landscaped front yard with mature oak trees".
- Include environmental and lighting details. Specify the setting and lighting conditions, such as "suburban neighborhood, late afternoon golden hour lighting" or "overcast day with lush greenery." This adds authenticity to the render and aligns it with specific regional characteristics.
Most AI platforms also offer built-in editing tools like brushes, erasers, and cropping features. Use these to refine your sketches before rendering. Additionally, explore different rendering modes to see which one works best for your style.
Once your sketches are properly formatted and annotated, you'll be ready to choose the right AI rendering platform for your project.
Choosing the Right AI Rendering Platform
Selecting an AI rendering platform that aligns with your project requirements is a critical step. Key factors to consider include pricing, the quality of output, customization options, and user-friendliness. With a wide range of tools available, each offering distinct features, making an informed choice is essential to ensure your workflow runs smoothly.
Comparing Popular AI Rendering Platforms
The market is filled with platforms like Rendair, ReRoom, ReRender, ArchiVinci, MyArchitectAI, ArchitectAI, PromeAI, D5, and ArchSynth. Among them, Render a House stands out for its transparent pricing and powerful features. It offers a flexible pay-as-you-go option at $3 per view and a Pro subscription at $39 per month, catering to both occasional users and those handling multiple projects. Additionally, it supports widely-used file formats, ensuring hassle-free integration into existing workflows.
These practical advantages make Render a House a standout option.
Why Render a House Works Best

Here’s why Render a House rises above the competition. Its advanced AI algorithms produce high-resolution renders with exceptional attention to detail, transforming simple sketches into photorealistic visuals. From authentic lighting to accurate material textures, the platform excels in creating lifelike representations. It even includes presets tailored to specific environments like suburban, countryside, and beachfront settings, making it versatile for various project needs.
For professionals, the Pro plan offers unlimited renders and multi-project management, streamlining creative processes and boosting productivity. Personalized customer support and an optional Studio Consulting service provide expert advice for tackling complex designs. By combining competitive pricing, consistent quality, and user-focused features, Render a House is an excellent choice for turning architectural sketches into stunning visualizations, especially for users in the U.S. market.
sbb-itb-a34ea2e
Step-by-Step Guide: Converting Sketches to Photorealistic Renders
Transforming your sketches into photorealistic renders is a straightforward process. It involves three main steps: uploading your sketch, fine-tuning settings, and exporting the final render.
Uploading and Preparing Your Sketches
Start by saving your sketches in a compatible format like PNG, JPG, or JPEG. Once uploaded, review the automatically processed preview. This is your chance to make any necessary adjustments to ensure the render aligns with your original vision.
After fine-tuning the preview, you’re ready to move on to customizing regional settings.
Customizing Regional Styles and Settings
Tailor your design to reflect U.S. architectural styles by choosing from preset options such as suburban, countryside, or beachfront. You can also adjust lighting to depict either daytime or nighttime scenes.
For material textures and finishes, use the built-in libraries to select the perfect look. If you’re subscribed to the Pro plan (US$39/month), you’ll gain access to advanced customization tools, giving you even more control over the details.
Once everything is set, it’s time to render your design.
Exporting and Applying Your Renders
When you’re satisfied with the settings, start the rendering process to produce high-resolution outputs. You can experiment with multiple views at no extra cost, giving you flexibility to explore different angles and perspectives.
The final high-resolution renders are ready to be integrated into your presentation tools. Pro users also benefit from the ability to manage multiple projects, making revisions and updates more convenient.
For a comprehensive presentation, consider uploading sketches from various angles to showcase a complete view of your design. This ensures your work is both visually striking and well-rounded.
Tips for Realistic Results Across Architectural Styles
Once you've transformed your sketches into renders, the next step is refining them to make your designs look as realistic as possible. Creating lifelike photorealistic renders means understanding the distinct traits of various U.S. architectural styles and tailoring your approach to match. By carefully adjusting materials, lighting, and environmental effects, you can bring your AI-generated visualizations to life.
Improving Realism with AI Tools
- Choose materials wisely: For traditional designs, opt for textured brick with visible mortar. Modern farmhouse styles benefit from smooth stucco paired with natural wood grain, while contemporary designs shine with clean, uniform textures.
- Fine-tune lighting: Use bright, warm lighting for sunny scenes or diffuse lighting for softer, moodier visuals. Adjust the light's direction and intensity to create natural shadows and reflections that enhance depth.
- Match landscaping to the climate: Include drought-tolerant plants for arid regions or deciduous trees for temperate zones to make your renders feel more authentic.
- Get the scale and proportion right: Use high-resolution textures for intricate details and maintain balanced proportions, especially for minimalist or simple designs.
- Add subtle weather effects: Incorporate slight touches of moisture, dust, or a faint atmospheric haze to give your render a natural, lived-in feel.
Fixing Common Rendering Problems
- Proportion issues: Double-check your sketches for clear measurement annotations to avoid disproportionate elements.
- Lighting inconsistencies: Specify the time of day and light direction to create realistic shadows and reflections.
- Material blending: Clearly separate textures using varied line weights or shading to prevent materials from visually merging.
- Color temperature mismatches: Stick to consistent light profiles and avoid mixing sources with different color temperatures.
- Vegetation scaling: Ensure plants and trees are scaled appropriately for the setting to maintain realism.
- Perspective distortions: Use precise drawing techniques and reference real-world examples to correct skewed perspectives.
- Repetitive textures: Break up repetitive patterns by introducing slight variations with advanced customization tools.
Conclusion: Improving Your Design Workflow with AI Rendering
Pairing meticulous sketch preparation with cutting-edge AI tools can streamline your entire design process, from initial concept to client approval. The ability to transform sketches into photorealistic renders has never been more efficient or accessible.
A key factor in achieving success is choosing the right rendering platform. Well-prepared sketches - clean, annotated, and with clear material notes - set the foundation for better results, as discussed earlier.
Render a House stands out with its competitive pricing and flexible subscriptions, tailored specifically for U.S. markets. Its customization options make it a valuable tool for professionals working on diverse projects, whether designing sleek, modern homes for California or classic colonials for the East Coast. When compared to platforms like Rendair, ReRoom, ReRender, ArchiVinci, MyArchitectAI, ArchitectAI, PromeAI, D5, and ArchSynth, Render a House offers a seamless user experience along with exceptional value. This reliability allows you to focus on the creative aspects of your work rather than getting bogged down in technical details.
With tools like Render a House, you can reclaim hours typically spent adjusting lighting and materials in complex software. Instead, you’ll have more time to refine your ideas and take on additional clients. The instant feedback loop between sketch and render accelerates iterations and boosts confidence in design decisions.
As AI technology progresses, these tools will only become more advanced and easier to use. Embracing AI-powered rendering now means enjoying faster project turnarounds and more impactful client presentations, setting you up for long-term success in a rapidly evolving industry.
FAQs
How do I prepare my sketches for AI rendering tools?
To achieve top-notch results with AI rendering tools, start with clean, precise sketches. Make sure your lines are clear and connected, steering clear of any extra marks or clutter. The better your input, the more refined the output will be.
For even better renders, focus on creating sketches with strong contrast and include detailed elements where necessary. Pair your visuals with concise, descriptive prompts about your design. This helps the AI generate textures, lighting, and materials that align with your vision. A clear and detailed starting point sets the stage for professional-quality results.
What should I consider when choosing an AI tool like Render a House for photorealistic rendering?
When choosing an AI rendering tool like Render a House, it's important to consider how well it delivers high-quality, photorealistic visuals while being quick and efficient. Pay attention to features like user-friendliness, compatibility with your current architectural software, and the realism of its textures, lighting, and materials.
You’ll also want to weigh factors such as cost, hardware needs, and the platform's ability to adapt to different architectural styles. Among competitors like ReRoom, ReRender, and ArchiVinci, Render a House distinguishes itself with faster rendering speeds, an easy-to-navigate interface, and outstanding visual results, making it a solid option for both seasoned professionals and beginners in the rendering field.
How do regional styles and environmental factors influence photorealistic rendering?
Regional styles and local conditions heavily influence the creation of realistic architectural renders. The design choices - like materials, textures, and specific elements - are often shaped by the area's architectural traditions and climate. For instance, homes in hot climates might use light-colored exteriors to reflect sunlight, while houses in colder regions often incorporate materials like stone or wood to improve insulation.
Environmental details, such as sunlight, weather patterns, and the surrounding landscape, also play a significant role in the rendering process. These factors affect how light, shadows, and reflections behave, which are key to making the render look lifelike. When these elements are accurately represented, the visualization feels more natural and fits seamlessly into its intended setting.